How to Photograph a Goliath Grouper
- Posted on
- By Nikole Heath
- Posted in Creature Feature, Scuba Tips
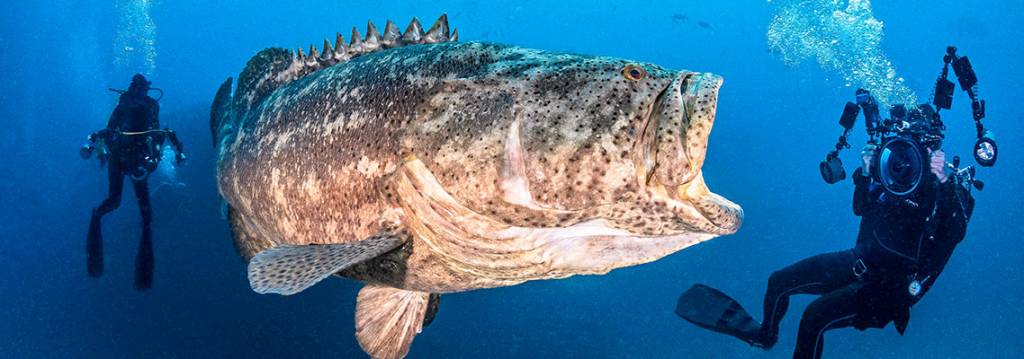
Every year the Goliath Groupers come to South Florida for a visit, and every year they pose a unique challenge to photographers. Here are some top tips on photographing these giants.
Select your Camera
Having a good camera with a wide-angle lens will work best to catch the funny face of a goliath grouper. This is especially true if you have the chance to meet Wilbur, the supermodel grouper that lives on the wreck of the M/V Castor. To get that shot with a DSLR camera, the Tokina 10-17mm lens with a dome port is preferred because it allows you to get the close up of the face and capture the rest of the body and background. If you are using a point-and-shoot camera consider a wide-angle wet lens to get this same effect. Remember your camera is digital, so take a lot of photos and bracket your shots. An image might look good on your LCD screen underwater but when you put it on your computer at home you might be disappointed by color tones or, worse, out-of-focus shots.
Not sure which camera will work for you? Contact our Force-E Photo Pros ([email protected]) and let them help you choose the right camera that will work for your diving style.
Select your lighting
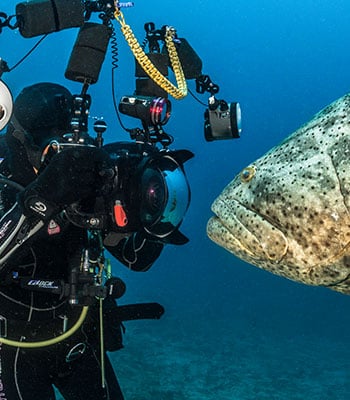
Goliath Groupers have a marble color skin tone. Knowing how to direct your light to this subject will help you succeed in bringing out the color of this fish. If no lighting is used they just look black. When using lights with your camera underwater, the preferred method is two strobes positioned as far away from both sides of the camera as possible and angled straight ahead. Your strobe will emit a cone of light where the two beams cross paths and if you keep your subject 3-6 feet away you should pick up only minimal backscatter. If you only have one strobe or one light use an arm directly over top of your camera positioned straight ahead, do not point it down in front of the lens. Remember that lights and strobes only work well 3-6 feet away from the subject, so if you are trying to get a photo of a large grouping of groupers it is best to use natural light (the sun) and play with your camera settings. Don’t worry because you can always adjust the image in post-production using Photoshop or Lightroom, so make sure to shoot your images in RAW.
Looking for more info about underwater photography? Consider taking our Intro to Photo Course with our Photo Pro Jason Spitz on Aug 22, 2017. He will go over the key fundamentals of underwater imagery (lighting, settings, tips & tricks) so that you don’t get photos of fish butts!
Select your Background
A Goliath Grouper in blue water is a nice photo, but to best show the shear size of this giant try using a wreck or a diver in your shot.
Using a wreck can work two ways. A close-up face shot of a grouper inside a hole on the wreck will not only portray the animals behavior, but a pop of color from the sponges and corals that grow on the wreck will enhance the set up to make a fantastic photo. Another way to use a wreck is to shoot a close-up of a grouper with a silhouette of a wreck in the foreground for a nice effect. Or try shooting up towards the surface and make both grouper and wreck a silhouette image with sunburst in the foreground.
Using a diver in your shot can prove to be tricky because the grouper might shy away from a diver and their loud bubbles. Over the years on our local reefs and wrecks there are resident groupers that have grown comfortable with divers. Choosing these resident groupers to photograph is a good way to go. Another thing to consider is diving using a rebreather. Rebreathers do not emit bubbles making it super easy to slide in next to a group of Golitahs to get that shot. It feels like the groupers think the diver is one of them!
When working with a diver to model for you, here are a few key things to consider and talk about before you get underwater. First, review hand signals and what you want them to do to pose. It can be frustrating when you are trying to get that shot and the diver does not understand your vision. Second, figure out how to control your models bubble making. Remind the diver that when you are going to take their photo to inhale at that moment because if they exhale the bubbles go across the mask and they are hard to edit out. Try using your fingers 1-2-3 and then take the photo so it gives the diver time to time their breaths.
Overall, it can be quite fun to find different ways to photograph a Goliath Grouper. We are looking forward to seeing some of your efforts so please be sure to you’re your Goliath Grouper photos on our Facebook page so we can share them!
